前言
b站java课程学习笔记整理。
b站视频: 黑马程序员全套Java教程_Java基础入门视频教程,零基础小白自学Java必备教程
201. 基本类型包装类
将基本数据类型封装成对象的好处是可以在对象中定义更多的功能方法操纵该数据。
常用的操作之一:用基本的数据类型和字符串之间的转换。
怎么理解呢? 比如 int a =10; 这里a只是一个变量。 但是如果 Integer i1 = Integer.valueOf(100),这样就创建了一个i1的对象。
这样就可以使用里面的方法了。
举例:我如果想要判断int a 的范围,如果a 单纯的是一个变量,那挺难判断的。
这个时候可以把int a装箱成Integer a,调用Integer中的MIN_VALUE和MAX_VALUE就可以找到答案。这就是装箱的优势。
基本数据类型
包装类
byteByte
shortShort
intInteger
longLong
floatFloat
doubleDouble
charCharacter
booleanBoolean
202. Integer
Integer 是int类的包装类型。
创建Integer的代码:
1
2
3
4
5
6
7
8
9
10
11
12
13
14
package Integer创建对象;public class GetInteger public static void main (String[] args) Integer i1 = Integer.valueOf(10 ); System.out.println(i1); Integer i2 = Integer.valueOf("10" ); System.out.println(i2); } }
203. Int和String的相互转换
注意:之前学过的那个强转的没有Int和String的转换!这俩在之前的知识中想要转换,要这么做:
1
2
3
4
5
6
7
8
public class IntStringThans public static void main (String[] args) int a = 10 ; String s = "" + a; System.out.println(s); } }
利用字符串拼接的特性。这么搞虽然简单但是有点不专业。第二种方法是使用String类中的valueOf构造方法。
代码:
1
2
3
4
5
6
7
8
9
10
11
12
13
14
15
16
17
package Int和String的转换;public class IntStringThans public static void main (String[] args) int a = 10 ; String s = "" + a; System.out.println(s); String s1 = String.valueOf(a); System.out.println(s1); } }
同理,String转int也是两种方法。完整代码:
1
2
3
4
5
6
7
8
9
10
11
12
13
14
15
16
17
18
19
20
21
22
23
24
25
26
27
28
29
package Int和String的转换;public class IntStringThans public static void main (String[] args) int a = 10 ; String s = "" + a; System.out.println(s); String s1 = String.valueOf(a); System.out.println(s1); System.out.println("---------------" ); String s2 = "100" ; Integer i = Integer.valueOf(s2); int x = i.intValue(); System.out.println(x); int y = Integer.parseInt(s2); System.out.println(y); } }
总结:
int转String用String.valueOf();String转int用Integer.parseInt();
204. 字符串中数据排序
需求:有一串字符串"91 27 46 38 50", 写程序让他输出成"27 38 46 50 91"
思路:
定义一个字符串。
把字符串中的数字存储到一个int数组中,然后排序。
对int数组排序
使用StringBuilder拼接成字符串
输出结果
1
2
3
4
5
6
7
8
9
10
11
12
13
14
15
16
17
18
19
20
21
22
23
24
25
26
27
28
29
30
31
32
33
34
35
36
package 字符串中的数据排序;import java.util.Arrays;public class SortString public static void main (String[] args) String s = "91 27 46 38 50" ; String[] strArr = s.split(" " ); int [] arr = new int [strArr.length]; for (int i = 0 ; i < arr.length; i++){ arr[i] = Integer.parseInt(strArr[i]); } Arrays.sort(arr); StringBuilder sb = new StringBuilder(); sb.append("\"" ); for (int j = 0 ; j < arr.length;j++ ){ sb.append(arr[j]); if (j!=arr.length-1 ){ sb.append(" " ); } } sb.append("\"" ); String result = sb.toString(); System.out.println(result); } }
思路分析:字符串不能排序,转换成数组应用Arrays.sort排序再用StringBuilder换回来就行了。
注意:最后构建出来的sb是StringBuilder类型!要用toString转换为String类型。
205. 自动装箱和拆箱
装箱: 把基本的数据类型转换为对应的包装类类型。
自动操作只不过就是简化了手动操作而已。
1
2
3
4
5
6
7
8
9
10
11
12
13
14
15
16
17
18
19
20
21
22
23
24
25
26
package 自动装箱与拆箱;public class Pack public static void main (String[] args) Integer i = Integer.valueOf(100 ); Integer i1 = 100 ; System.out.println("____________________________________________________________-" ); i1 = i1.intValue()+200 ; i1 += 200 ; Integer i2 = null ; i2 += 200 ; } }
206. Date
构造方法:
方法名
说明
public Date()分配一个无参对象,并初始化,以便他代表它被分配的时间,精确到毫秒
public Date(long date)分配一个带参对象,并将其初始化为表示从标准基准时间起指定的毫秒数
构造方法:
1
2
3
4
5
6
7
8
9
10
11
12
13
14
15
16
package Date类构造;import java.util.Date;public class DateDemo public static void main (String[] args) Date a = new Date(); System.out.println(a); long date = 1000 *60 *60 ; Date b = new Date(date); System.out.println(b); } }
207.Date常用方法
方法名
说明
public long getTime()获取从1970年1月1日00:00:00到现在的毫秒值
public void setTime(long time)设置时间,给的是毫秒值
1
2
3
4
5
6
7
8
9
10
11
12
13
14
15
16
17
18
19
20
21
22
23
24
25
26
27
package Date类方法;import java.util.Date;public class DateTest public static void main (String[] args) Date d = new Date(); System.out.println(d.getTime()); System.out.println("距今过去了" +d.getTime()*1.0 /1000 /60 /60 /24 /365 +"年" ); Date s = new Date(); System.out.println(s); long time = 1000 *60 *60 ; s.setTime(time); System.out.println(s); long timi = System.currentTimeMillis(); Date x = new Date(); x.setTime(timi); System.out.println(x); } }
208. SimpleDateFormat类
SimpleDateFormat是一个具体的类,用于以区域设置敏感的方式格式化和解析日期。说人话就是用来规范输出日期的格式的。
字母
代表
y年
M月
d日
H时
m分
s秒
方法名
说明
public SimpleDateFormat()构造一个SimpleDateFormat,使用默认模式和日期格式
public SimpleDateFormat(String pattern)构造一个SimpleDateFormat,使用给定的模式和默认的日期格式
public final String format(Date date): 将日期格式化成日期/时间字符串。
public Date **parse(String source)**: 从给定字符串开始解析文本,以生成日期。
利用该类对日期进行格式化和解析:
1
2
3
4
5
6
7
8
9
10
11
12
13
14
15
16
17
18
19
20
21
22
23
24
25
26
27
28
29
30
31
import java.text.ParseException;import java.text.SimpleDateFormat;import java.util.Date;public class SimpleDateFormat 演示 public static void main (String[] args) throws ParseException Date d = new Date(); SimpleDateFormat sdf = new SimpleDateFormat(); String s = sdf.format(d); System.out.println(s); Date f = new Date(); SimpleDateFormat sdf1 = new SimpleDateFormat("yyyy年MM月dd日 HH:mm:ss" ); String s1 = sdf1.format(f); System.out.println(s1); String s2 = "2042-10-20 11:11:11" ; SimpleDateFormat sdf2 = new SimpleDateFormat("yyyy-MM-dd HH:mm:ss" ); Date x = sdf2.parse(s2); System.out.println(x); } }
209. 日期工具类
需求:定义一个日期工具类。包含两个方法:八日起转换为指定格式的字符串,把字符串解析为指定格式的日期。然后用测试类测试。
思路:
定义日期工具类(DateUtils)
定义一个方法dateToString,用于把日期转换为指定格式的字符串。
返回值类型:String
参数:Date date, String format
定义一个方法stringToDate, 用于字符串解析为指定格式的日期。
返回值类型:Date
参数:String s,String format
定义测试类DateDemo,调用方法。
补充:可以把它当成是一个工具类,构造方法应该私有,成员方法应该静态。
1
2
3
4
5
6
7
8
9
10
11
12
13
14
15
16
17
18
19
20
21
22
23
package 日期工具类;import java.text.ParseException;import java.text.SimpleDateFormat;import java.util.Date;public class DateUtils private DateUtils () public static String dataToString (Date date,String format) SimpleDateFormat sdf = new SimpleDateFormat(format); String s = sdf.format(date); return s; } public static Date stringToDate (String s, String format) throws ParseException SimpleDateFormat sdf = new SimpleDateFormat(format); Date d = sdf.parse(s); return d; } }
1
2
3
4
5
6
7
8
9
10
11
12
13
14
15
16
17
18
19
package 日期工具类;import java.text.ParseException;import java.util.Date;public class DateDemo public static void main (String[] args) throws ParseException String format = "yyyy年MM月dd日 HH:mm:ss" ; Date d = new Date(); System.out.println(d); String result = DateUtils.dataToString(d, format); System.out.println(result); Date new_date = DateUtils.stringToDate(result,format); System.out.println(new_date); } }
210. Calendar类
Calendar为某一时刻和一组日历字段之间的转换提供了一些方法,并未操作日历字段提供了一些方法。
Calendar提供了一个类方法getInstance 用于获取Calendar的对象,其日历字段已使用当前日期和时间初始化。
示例:Calendar rightNow = Calendar.gerInstance();
1
2
3
4
5
6
7
8
9
10
11
12
13
14
15
16
17
18
package Canlendar类;import java.util.Calendar;public class CalendarDemo public static void main (String[] args) Calendar c = Calendar.getInstance(); System.out.println(c); int year = c.get(Calendar.YEAR); int month = c.get(Calendar.MONTH) + 1 ; int date = c.get(Calendar.DATE); System.out.println(year + "," + month + "," + date); } }
需要注意的是Calendar.MONTH是从0开始计数的。
211. Calendar的常用方法
方法名
说明
public int get(int field)返回给定日历字段的值
public abstract void add(int field, int amount)根据日历的规则,将指定的时间量添加或减去给定的日历字段(修改日历的)
public final void set(int year,int month, int date)设置当前日历的年月日(设置日历的)
1
2
3
4
5
6
7
8
9
10
11
12
13
14
15
16
17
18
19
20
21
22
23
24
25
26
27
28
29
30
package Canlendar类;import java.util.Calendar;public class CalendarMethod public static void main (String[] args) Calendar c = Calendar.getInstance(); c.add(Calendar.YEAR,10 ); c.add(Calendar.DATE,-5 ); int year = c.get(Calendar.YEAR); int month = c.get(Calendar.MONTH) + 1 ; int date = c.get(Calendar.DATE); System.out.println(year + "," + month + "," + date); c.set(2048 ,11 ,7 ); int year1 = c.get(Calendar.YEAR); int month1 = c.get(Calendar.MONTH); int date1= c.get(Calendar.DATE); System.out.println(year1 + "," + month1 + "," + date1); } }
注意:使用set方法设置的月份设置多少就是多少。老师讲错了。
212. 二月天
需求:获取任意一年的二月有多少天。
思路:
键盘录入任意年份。
设置日历对象的年月日。
年:来自键盘的录入。
月:设置为3月,月份是从0开始的,所以设置的值为2 .
日:设置为1日。
3月1日往前推一天就是2月的最后一天
输出这一天的数值。
1
2
3
4
5
6
7
8
9
10
11
12
13
14
15
16
17
18
19
20
21
package 二月天;import java.util.Calendar;import java.util.Scanner;public class FebDays public static void main (String[] args) Scanner sc = new Scanner(System.in); int yearNum = sc.nextInt(); Calendar c = Calendar.getInstance(); c.set(yearNum, 2 , 1 ); c.add(Calendar.DATE, -1 ); int day = c.get(Calendar.DATE); System.out.println(yearNum + "年的二月,一共有" + day + "天" ); } }
213. 异常
就是程序出现了不正常的情况。
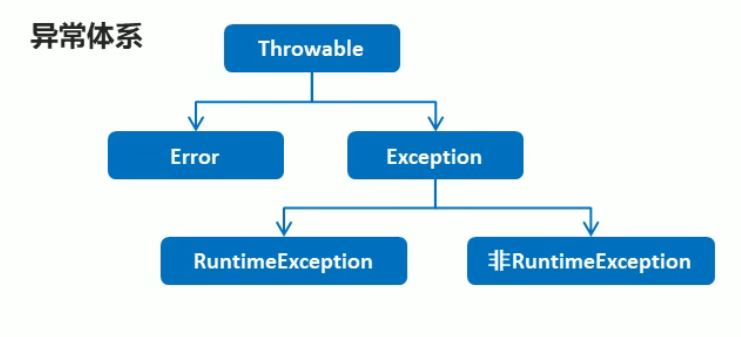
异常的体系:
Error是严重问题,不需要处理。Exception表示程序本身可以处理的异常。
RuntimeException:在编译期是不检查的,出现问题后,需要我们回来修改代码。(比如索引越界)
非RuntimeException:编译期就必须处理的,否则程序不能通过编译,就更不能正常运行了。
214. JVM的默认处理方案
如果程序出现问题,我们没有做任何处理,最终JVM会做默认的处理
把异常的名称,异常原因及异常出现的位置等信息输出在了控制台。
程序停止执行。
215. 异常处理之try…catch
格式:
1
2
3
4
5
6
try { 可能出现异常的代码; }catch (异常类名 变量名){ 异常的处理代码; }
程序从try里面的代码开始执行,出现异常,会自动生成一个异常类对象,该异常对象将会被提交给Java运行时系统。
当Java运行时系统接收到异常对象时,会到catch中去找匹配的异常类,找到后进行异常的处理。
执行完毕后,程序还可以继续往下执行。
1
2
3
4
5
6
7
8
9
10
11
12
13
14
15
16
17
18
19
20
package 异常;public class ExceptionDemo public static void main (String[] args) System.out.println("开始" ); method(); System.out.println("结束" ); } public static void method () try { int [] arr = {1 ,2 ,3 }; System.out.println(arr[3 ]); }catch (ArrayIndexOutOfBoundsException e){ e.printStackTrace(); } } }
216. throwable的成员方法
方法名
说明
public String getMessage()返回此throwable的详细消息字符串
public String toString()返回此可抛出的简短描述
public void printStackTrace()把异常的错误信息输出在控制台
1
2
3
4
5
6
7
8
9
10
11
12
13
14
15
16
17
18
19
20
21
22
23
package 异常;public class ExceptionDemo public static void main (String[] args) System.out.println("开始" ); method(); System.out.println("结束" ); } public static void method () try { int [] arr = {1 ,2 ,3 }; System.out.println(arr[3 ]); }catch (ArrayIndexOutOfBoundsException e){ System.out.println(e.getMessage()); System.out.println(e.toString()); e.printStackTrace(); } } }
217. 编译时异常和运行时异常的区别
编译时异常:必须显示处理,否则程序就会发生错误,无法通过编译。例子:之前那个sdf.parse(s)。format和pattern可能不匹配。所以会有“可能异常”的警告。
运行时异常: 无需显示处理,也可以和编译时异常一样处理。(比如用try...catch)例子:之前那个索引越界。
所有的RuntimeException类及其子类都是运行时异常。
218. 异常处理之throws
有的时候用try...catch处理异常时没有权限,这个时候使用throws。
throws并没有真正的处理这个异常,只不过是一种向调用者“甩锅”的行为。最后还得调用者使用try...catch处理(当然了也可以接着抛,抛给java虚拟机)。
throws一般处理编译时异常。
219. 自定义异常
只要继承Exception这个类就可以自定义异常。写的时候要写无参和带参构造。
1
2
3
4
5
6
7
8
9
10
package 自定义异常;public class ScoreException extends Exception public ScoreException () public ScoreException (String message) super (message); } }
1
2
3
4
5
6
7
8
9
10
11
12
package 自定义异常;public class checkScore public void checkScore (int score) throws ScoreException if (score<0 ||score>100 ){ throw new ScoreException("你给的分数有误" ); }else { System.out.println("分数正常" ); } } }
1
2
3
4
5
6
7
8
9
10
11
12
13
14
15
16
17
18
19
20
21
package 自定义异常;import 老师与学生.继承版.Teacher;import java.util.Scanner;public class teecherTest public static void main (String[] args) Scanner sc = new Scanner(System.in); System.out.println("请输入分数:" ); int score = sc.nextInt(); checkScore t = new checkScore(); try { t.checkScore(score); } catch (ScoreException e) { e.printStackTrace(); } } }
总结:
先自定义一个异常,该异常可以有无参构造和带参构造。
在需要产生异常的时候,使用throw手动的抛出异常(注意方法也要相应的throws甩锅给调用者)
main函数在使用的时候用try...catch解决异常(或者接着抛)。throws和throw的区别:
throwsthrow
跟在方法声明后面,跟的是异常类名
跟在方法体内,跟的是异常对象名
表示抛出异常,由该方法的调用者来处理
表示抛出异常,由方法体内的语句来处理
表示出现异常的一种可能性,不一定发生
一定发生了异常


